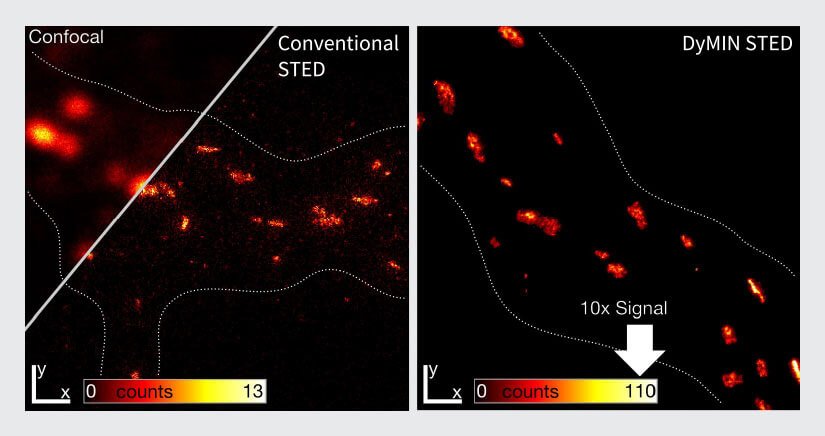
Every technique that allows to observe cells is more or less invasive and fluorescence microscopy is no exception. Many imaging situations profit from a reduction in light dose as provided by FLEXPOSURE adaptive illumination. With FLEXPOSURE adaptive Illumination, light is applied to the sample only where necessary. To this end, structural information is accessed point-by-point using confocal- and low-intensity-STED probing in order to decide where it's worth to record with full illumination. This way, the light exposure on the sample is reduced dramatically, facilitating live-cell experiments, highresolution imaging, and superior signal. Which out of the three FLEXPOSURE adaptive illumination methods is best for a given sample depends on a range of factors. Clearly, MINFIELD is the tool of choice for very high-resolution, high-signal STED images of structures with sizes of a few hundred nanometers. If structures get bigger, RESCUE or DYMIN can be applied. Generally, since RESCue uses only a single probing step, it conserves imaging speed and is best used for fast recordings and/or live-cell experiments. The resolution achieved with DYMIN is superior, however, a DYMIN image takes a little longer due to the additional probing steps and therefore lends itself more to fixed samples. Nevertheless, DYMIN has been applied to living brain slices, too (Fig.6C). A major breakthrough in this respect was made by the introduction of RESCUE, DYMIN, and MINFIELD, a triad that vastly enlarged the triangle spanned between spatial resolution, temporal resolution, and signal level. The principle underlying these three methods is the same and they are often summarized under the term “adaptive illumination”. Instead of constantly scanning at full power, the sample is only illuminated in places where light can make a positive contribution to the image. In other words, the illumination is adapted to the underlying structure of the sample. A typical sample is sparse. Consequently, the corresponding image consists mostly of background (out-of-focus light, autofluorescence) or simply dark areas. It makes sense not to illuminate these regions and save the sample from most of the light dose that would otherwise be applied. Furthermore, skipping dark areas is also beneficial for areas that do contain signal, for two main reasons. First, the excitation beam is a double cone (Fig. 1). Away from the focal plane, it becomes less intense, but also broader, so that the total intensity is conserved. As the excitation beam is scanned over the sample, the actual focus hits each spot only once, but the cones constantly overlap and their intensities – although small – sum up to the same intensity as in the focus (the effect is the same as in a photograph where out-of-focus background is blurred, but not dark). Hence, avoiding unnecessarily illuminating in-focus regions spares out-of-focus regions from a lot of light that would otherwise cause photobleaching and photodamage. This has the greatest effect when recording threedimensional stacks, and it applies to confocal as well as STED imaging. The second reason not to illuminate dark areas is that the focus of a laser beam is not an infinitely small point, but a volume known as the point spread function (PSF). With STED microscopy, the difference between resolution and PSF-size can be quite big: while STED microscopes reach sub-30 nm resolutions even without adaptive illumination, the STED PSF itself is still diffraction-limited and has a diameter about ten times this size. Hence, the illuminated area can be a hundred times larger than the region from which fluorescence is actually collected. This means that many times during a scan, while an empty region is recorded, the excitation and, in particular, the STED PSF reach into adjacent regions that do in fact contain fluorescent markers (Fig.2 A). These markers are subjected to high intensities, but unnecessarily so, because no useful photons can be collected from the empty region. For these reasons, it is advisable to skip the illumination of empty regions in the sample, but the question remains how to determine where these regions are, without illuminating them in the first place. Confocal probing to the RESCUE One option is to take a quick, low-signal, low-damage confocal image, thresholding it and using this as a mask during the final scan to determine when to blank the excitation and STED lasers. However, a potential challenge to this approach is that the sample may drift and/or a living specimen may move in between the probe step and final scan. A better approach is to probe the sample point by point while it is recorded point by point (Fig. 2). This entails moving to the next scan position, switching on the excitation beam, waiting for a short amount of time, and checking whether a certain number of fluorescent photons have arrived. If positive, it can be assumed that fluorescent markers are present at this particular scan position and one can continue to excite and collect photons until the desired signal level has been reached. (Of course, STED can be switched on, too.) If no or only a few photons are registered during the first probing step, this region is likely empty, and all beams are switched off for the remainder of the pixel dwell time. If the sample is, say, 80% sparse, this automatically and immediately translates into 80% less light applied to the sample and its fluorescent molecules that are currently out of focus. For a volume recording, this can be the decisive difference between a good image and no image at all. Additionally, infocus markers profit, too, due to reason two above. This scheme – confocal probing, followed by a decision whether to continue imaging or not – is known as RESCUE. It requires fast light control on sub-μs timescales, usually provided by an acoustooptic device, and an intelligent decision-making scheme that robustly separates background from wanted signal. Notably, once the decision has come out positive, imaging is carried out exactly the same as before, making RESCUE a fully quantitative method. Always look on the bright side of the fluorophore As discussed, the STED PSF is usually a few hundred nanometers in size. When the scan is approaching a region containing fluorescent markers, the STED PSF starts to overlap with it long before fluorescence, which can only come from the center of the donut, is actually detected. RESCUE helps to mediate this, but the confocal probing step itself is limited by diffraction. Hence, when the scan comes within ~100 nm of a fluorescent molecule, the confocal probing decision turns positive and illumination is set to full, although the following STED-step does not yield fluorescence for another 70-80 nm towards the molecule. Shortly after RESCUE had been published, it became clear that it can be improved if, after the initial confocal probing step, STED is used in order to probe further, now with subdiffraction resolution (Fig. 2). This is the idea behind DyMIN (Dynamic intensity minimum). In fact, DyMIN uses multi-STED-probing at different STED intensities – each time the scan comes a little closer to the molecule, the STED intensity used in the probing step is slightly ramped up, giving more information without applying more power than absolutely necessary. With this, the boundary between empty regions and regions containing fluorescent markers can be finely defined. More importantly, since the relationship between resolution and STED power follows a square root law, at low STED powers a slight increase already gives huge returns in resolution. Thus, probing with very low-power STED light can significantly improve the probing decision. This, and the fact that too many STED probing steps increase scan duration and cumulative STED power, means that in practice, one confocal probing step followed by 2-3 STED probing steps is most advantageous. With DYMIN, the light dosages impinging on fluorescent markers and the specimen can be lowered by a factor of 10 to 100 in practically relevant samples (Fig.2). This means that either up to hundred times more images can be recorded from the same region (Fig.5), signal can be increased many times (Fig.4), or resolution can be improved by a factor of about two to three (Fig.3). With this, the triangle between speed, resolution, and signal inside which the operator can choose imaging parameters becomes considerably larger and leads to images not accessible with conventional STED. It should be noted that DYMIN, unlike RESCUE, imposes different STED light intensities on the structures, depending on the shape of other structures in its vicinity. This is because with RESCUE, the probing decision is binary and once a structure has been hit, it is imaged with full illumination. In contrast, with DYMIN, a different number of probing steps is possible for each scan step until the decision becomes positive. Nevertheless, the gains that can be achieved with DYMIN are so high and in many cases, an image where photobleaching varies over the sample is better than getting no image at all. Minimal intensity for maximal resolution Further reductions in light dose can be achieved with a slightly different scheme, called MINFIELD. Here, the idea is to confine the scan to a small region only, to avoid exposing the fluorophores of interest to the high-intensity crest of the STED donut. This means that the field-of-view must be smaller than the central zero-to-low intensity region of the STED donut, but this area is only exposed to low intensities and can be recorded with extremely high resolution because photobleaching is largely avoided. With MINFIELD, bleaching reduction of up to 100-fold has been demonstrated and at around 15 nm, the highest STED resolutions have been shown with conventional fluorophores. MINFIELD is used to gain maximal resolution and signal from structures with sizes on the order of a few hundred nanometers and below, such as viruses, vesicles, nuclear pore complexes. Fig.3 Resolution increase with FLEXPOSURE adaptive illumination. Two proteins (Nuclear pore complex (NPC) in green and lamina in red) around the nuclear membrane were immunolabelled using Abberior STAR Orange and STAR RED. Shown is raw data. Resolution for the NPCs is isotropic and around 60nm, the highest resolution figure reported for 3D-STED with conventional fluorophores, with the exception of MINFIELD 3D-STED. Fig.4 Signal increase with FLEXPOSURE adaptive Illumination. Left: Confocal and conventional STED imaging on gephyrin clustering at inhibitory synapses of rat hippocampal neurons. Right: the same sample recorded with DYMIN STED. All other parameters equal, the signal is increased by a factor of ten, reducing noise and making substructures clearly visible that cannot be discerned with conventional STED. Fig.5 Increased number of frames for life-cell imaging with FLEXPOSURE adaptive illumination. The much lower light dose and photobleaching facilitates time laps imaging of living cells. Here, 120 images of the same sample area are recorded at 50 nm resolution without significant bleaching or sample stress. Note the growing tubulin fibers. Inlet shows the light dose reduction, *compared to CW-STED. Cell: Fibros, label: SiR, same look-up table for all images. Fig.6 The neuroprotein PSD95 imaged with FLEXPOSURE adaptive illumination. (A) Fixed and immunolabeled PSD95 cluster. Size of one image is 800nm x 800nm. (B) Line profile showing the resolution of the profile highlighted in (A). (C) Living mouse brain slice image of PSD95 clusters (red) imaged with FLEXPOSURE adaptive illumination STED and a confocal counterstaining of neuros (green).
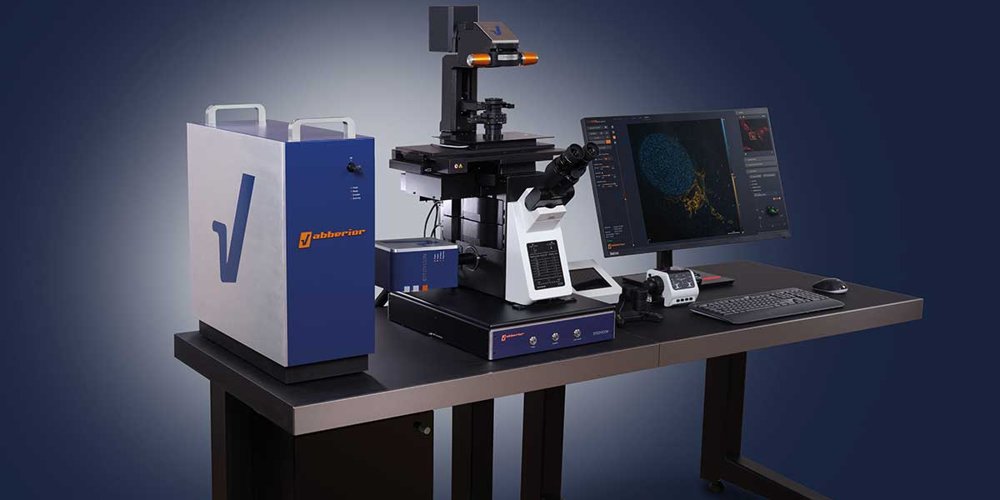
The INFINITY platform is the most customizable solution for all things microscopy. Whether it’s STED and confocal microscopy, intravital microscopy, material science or optical trapping, the INFINITY is always up to the challenge. Just tell us what you need and we will build you a customized, continuously upgradable system specialized for your research. The INFINITY is a highly flexible open platform that can be extended and upgraded, even years after purchase. It can be combined with all MODULES and any custom developments to form a truly unique microscope that suits all your imaging needs. Get in touch with us and we will design and manufacture a tailor-made instrument that leaves nothing to be desired. To protect your investment, we guarantee that your INFINITY grows with your science. And it grows with us. Your system could be a totally different machine a few years from now, because we at abberior make sure that everything we develop in the past, present or future can be retrofitted into your microscope. This way, you always stay at the forefront of science. Your INFINITY microscope is assembled with standard optical and optomechanical components that are freely placed on a breadboard. This gives us 100% flexibility as we realize everything you need for your imaging experiments. This unmatched modularity guarantees that we have a tailor-made, unique solution for you that we can continuously upgrade – to infinity. The standard microscope body for the INFINITY is the Olympus IX83, but we wouldn’t be abberior if we didn’t offer virtually any stand with the INFINITY. Upright and inverted and even both on the same microscope. The same modularity also guarantees that we at abberior can introduce new developments at lightning speed – for example our new MATRIX detector. While others are still figuring out how to modify their static, inflexible systems, our world-class engineers have already implemented the innovation. Our iMSPECTOR software is every bit as flexible. Because tailor-made hardware is nothing without tailor-made software, we have developed an application that allows low-level control of any custom hardware under the INFINITY hood. At the same time, it presents all high-level functions required for imaging to the user: 1D to 4D-recording in confocal and STED-mode combined with advanced postprocessing. Our easyCommander (right) simplifies your workflow and helps you get things done intuitively, because at a push of a button, it automatically applies individual dye- and sample-based settings to make the best out of your sample, while it gives you full flexibility for optimization. And for even easier imaging: rest assured, our highly user-friendly LiGHTBOX software also runs on the INFINITY(but only on the FACILITY hardware subset) - Multicolor laser scanning confocal and STED microscope - High-end performance - Accessible optomechanical design, open electronics and software platform, ready to implement your own imaging ideas - Zero-compromize on performance – get outstanding resolution performance in STED microscopy - We offer unrivaled flexibility in customizing the microscope to your applications Stay at the forefront of progress by upgrading your INFINITY microscope to cutting edge components with our EVERGREEN sustainability initiative that breathes new life into your deserving equipment – boosting user-friendliness and power, all while driving a more sustainable future.
CATEGORY
A sleek, blue box transforms your widefield microscope into a confocal, superresolution STED, and lifetime instrument and your exploration of subcellular structures into a seamless, discovery-rich experience. Carefully designed with masterly engineering, STEDYCON breaks the stereotype of the finicky, hard-to-use scope. It opens new possibilities at the press of a button for any user and almost any location. How does it do it? The secret’s in the box. The STEDYCON upgrades your existing widefield system to a confocal and a superresolution STED microscope with a resolution down to 30 nm. At first glance, STEDYCON is a blue-and-metal casing about the size of a shoebox that sits on the camera port of a microscope. It is compact, unobtrusive, and sturdy. The plain exterior presages its ease-of-use but belies what lies within. Carefully planned engineering and design transform your microscope into a multicolor confocal and 2D STED system. It’s like plugging your scope into an amplifier and being rewarded immediately with power. To begin with, the engineers tackled the big nuisances that make superresolution microscopy finicky. STEDYCON requires no alignment of the excitation and depletion lasers. They are aligned by design. With a novel optical arrangement that sends all laser beams through the same fiber, the system is more stable than other STED microscopes where beams travel separately. That inherent stability shortens the time to initiate imaging and simplifies installation, which takes only minutes. Furthermore, STEDYCON includes a scanner technology that allows it to operate with any widefield microscope, equalizing performance across platforms and precluding the need for dedicated equipment. The engineers also revamped the autofocus. Unlike conventional optical instruments that use a dichroic mirror to couple the autofocus laser with the imaging beam path, STEDYCON runs the two beams parallel but segregated. Thus, autofocus in STEDYCON never interferes with imaging, which can produce fluorescence loss or distortions. With the simple press of a button, STEDYCON guarantees drift-free focus for extended imaging sessions up to several days. Also, as STEDYCON is equipped to control motorized stages, it automates the recording of multiple positions in a sample or a tile scan. The user is thus released from sitting at the microscope and can easily capture the whole sample or navigate across it to find objects of interest. Secondly, STEDYCON makes superresolution microscopy a research technique for everyone. With minimal training, even novices to microscopy can produce high-quality STED images with a few intuitive manipulations of a browser-based control system with a user-friendly interface. Whichever the chosen procedure, users commonly visualize structures at a resolution of 30 nm. The same applies to lifetime imaging, which is fully integrated into the software with TIMEBOW. Finally, STEDYCON makes no compromises on sensitivity or dynamic range of detection. The avalanche photo detectors (APDs) in STEDYCON have superior quantum efficiency. Thus, they reliably collect photons even under low-signal conditions, like when labeling densities are minimized to preserve physiological conditions in samples. This feature ensures clear images and exceptional signal-to-noise ratio, even under high-signal conditions. Being frame-agnostic, STEDYCON complements microscopes of various makes and models. Exceptionally stable, it breaks with convention by operating flawlessly in dedicated labs, trade fair floors, living rooms, and even campsites.
CATEGORY
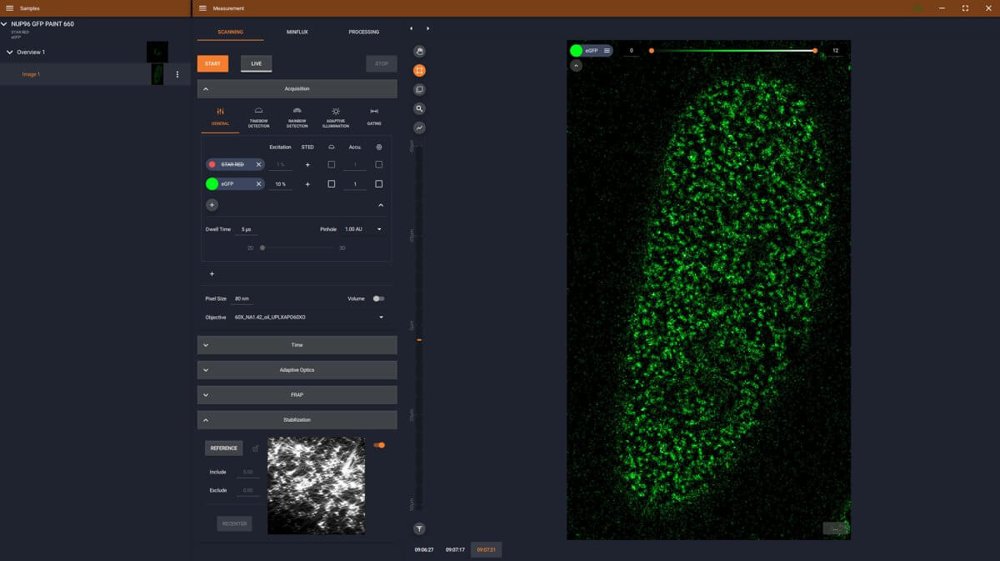
for MIRAVA POLYSCOPE and FACILITY Easy to use no ifs, ands, or buts Our LiGHTBOX software for the MIRAVA POLYSCOPE and the FACILITY platform is incredibly easy to use. It was designed from scratch to furnish a user interface that allows beginners to intuitively arrive at a top-notch STED image with hardly any training. At the same time, it triggers a steep learning curve and gives expert users full control over the instrument. The streamlined workflow outshines everything you have seen before. Even MINFLUX imaging is a piece of cake with the MIRAVA POLYSCOPE and LiGHTBOX. LiGHTBOX directly connects to the internal hardware control module. For the most complex control tasks, this module can also be directly programmed via Python Remote Control. And for the geeky microscopist, iMSPECTOR offers a graphical user interface with direct access to lower-level machine settings. This includes the easyCommander module, which provides an overview of the most important experimental parameters. The LiGHTBOX user interface is clearly structured and may largely be operated by drag-and-drop. Always keep the overview with TreeView Never sink into the mess of unordered imaging sessions again – TreeView guarantees that you always keep the overview. All images are grouped hierarchically and context between measurements is kept from the sample level over large overviews down to final images. This way, STED and confocal measurements can always be spatially related to the greater environment of the sample, and you can switch between different modes at the push of a button. There is no need to zoom out to find a good area, followed by zooming in, adjusting settings such as pixel size and line frequency, taking an image, zooming out again, re-adjusting pixel size… all this is one click in the LiGHTBOX. On top, TreeView allows you to drag and drop settings to other images. Perform tiled scans and rotate ROIs as you wish LiGHTBOX facilitates tiled scans, and in every scan you can select an arbitrary number of ROIs. Every ROI itself can serve as an overview again, meaning that you can easily climb down from sample level overviews to detailed superresolution images, while spatial context is saved at all times. Of course, you may rotate ROIs arbitrarily, even in STED mode! Configure individual frame steps You may define separate frame steps for each detection channel to e.g. change the pixel dwell time, adjust excitation, or include MATRIX detection – and that’s it! Adjust detection filters With RAINBOW detection, you can adjust detection filters on the fly to collect as many precious photons as possible with optimal wavelength discrimination. Generate 3D views The 3D viewer allows you to render volumetric 3D images easily and quickly – just like this. Export 3D images Export videos of your acquired 3D images and movies with just a few clicks. Post-process your images How does LiGHTBOX post-processing work? – Software tutorial To analyze and process images, you can easily create a flexible pipeline with our post-processing modules. Correct for aberrations RAYSHAPE your image! Our dynamic aberration correction is based on a deformable mirror and corrects for aberrations arising from the refractive index mismatch between immersion and embedding media as well as for sample-induced aberrations. Define correction values with two simple sliders and your images will be crisp and bright from top to bottom and leave nothing to desire. Be gentle to your sample … and turn the lasers off when there is nothing to be seen. Based on low-light probing steps directly before imaging each pixel, FLEXPOSURE adaptive illumination dynamically shuts down lasers where no structure is detected. This brings down the light dose by up to two orders of magnitude, without compromising on contrast and resolution. And again, switching on FLEXPOSURE is a matter of a few clicks in LiGHTBOX. Image as long as you like – bleaching was yesterday. Give time a color with TIMEBOW It’s not only about where your fluorescence signal comes from and when. It’s also about how long it lasts. Explore what fluorescence lifetime has in store for you with TIMEBOW. The module is fully integrated into our LiGHTBOX software and visualizes the temporal dynamics of fluorescence decay in an interactive phasor plot. Process lifetime information within seconds: fluorophores in the same spectral channel but with different lifetimes are separated, giving you more channels and more flexibility. From here, it’s just another click to a colorful lifetime image that reveals previously hidden structural details. Localize single molecules with MINFLUX MINFLUX imaging is easier than ever in LiGHTBOX. The MINFLUX module of the MIRAVA POLYSCOPE is fully integrated on software level: you can instantaneously navigate to it by switching to the MINFLUX tab. So setting up and controlling a MINFLUX measurement is a matter of just a few clicks. The MINFLUX measurement starts with a confocal overview. Simply choose your region of interest and switch on the stabilization module to set your reference plane. Once in the MINFLUX tab, it’s just a few clicks to set the excitation and activation laser powers before hitting ‘Run’. And during acquisition, all major parameters are perfectly within view, such as the stabilization window – showing you that the sample is perfectly stable for nanometer precision measurements – and details on count rate, number of localizations, etc. Enjoy automated alignment for all beam paths Our Full Autoalignment guarantees that your laser foci maintain optimum shape and position, ensuring a perfect intensity zero in the STED donut center for the best possible resolution in X, Y, and Z. Just push the button, and you will be ready to run a microscope in perfect shape! … and if you seek more in depth control of your MIRAVA or FACILITY microscope, you may instantly switch from LiGHTBOX to iMSPECTOR and back again. And for the geeks out there: You may also customize your image acquisition and analysis by running scripts from Python, MatLab, or C with our Python Remote Control.
CATEGORY
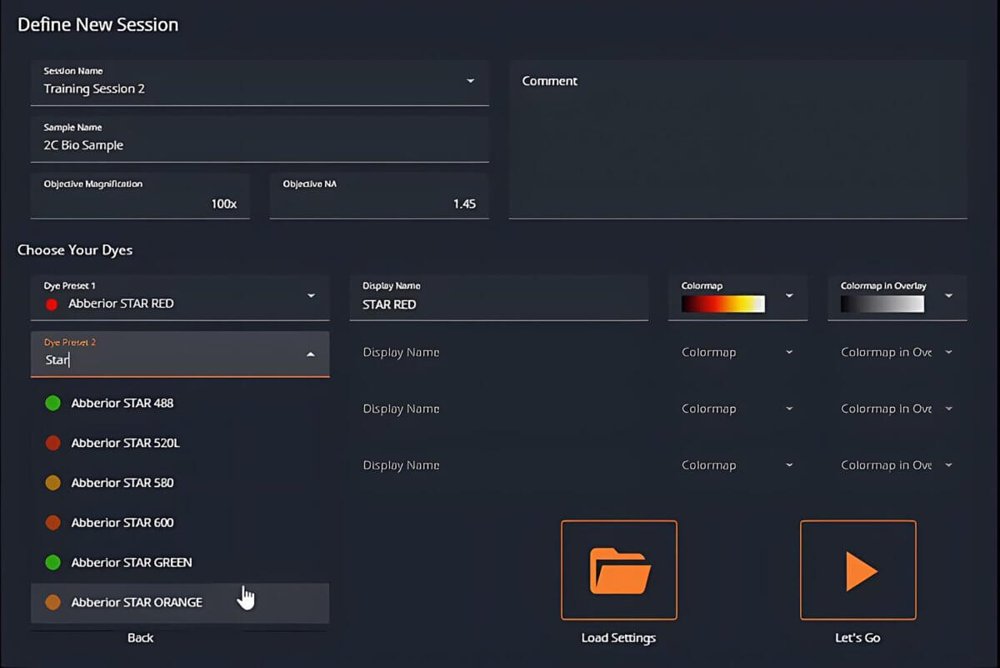
Browser based software meets shoebox design, yeehaw! The STEDYCON is ease-of-use in a shoebox. And this doesn’t apply just to the hardware – for the software, our STEDYCON smart control, is all about user-friendliness, as well. The software is browser-based, so there is no need for installation. You may run it from any device, from any platform, from everywhere! It is really plug-and-play: Just connect your device, open the link in your browser, and take off to new spheres of imaging! On the lowest level, the hardware is controlled by embedded software, which you will never get directly in touch with as a user. Get started with just a few clicks The perfect STED image is only three clicks away. Even novices to microscopy can produce high-quality STED images after minimal training as the software is so intuitive to handle. Thanks to the integrated dye database, only minimal user input is needed, even with unknown samples. The clever way of imaging Adjusting settings the way you need them is done quickly thanks to the tidy and intuitive user interface. Sample overview, acquisition, display settings, and imaging analysis are always within shortest reach. And there is a separate tab for special applications such as z-stack, ROI queue, or time series. Multipositioning: Let our STEDYCON do the work Discover your whole sample, and then take your time to define your experiment – at which position would you like to acquire a z-stack, or a single image, or a tiled scan? Let the microscope do the imaging for you. Increase your working efficiency, let it run over night, or already prepare your next experiment! It saves time and endless clicks … Multipositioning: What you see is what you get The integrated STEDYCON gallery makes it easy to work on your images after acquisition, to optimize, sort, and analyze. Export is incredibly easy and yields ready-to-use images with your lookup table of choice, in the data format you prefer, and with scalebar and colorbar if desired. There is also a stand-alone version of STEDYCON gallery for Windows so that you can edit the images at your desk. Give time a color with TIMEBOW With TIMEBOW, you unlock an entirely new dimension of information: fluorescence lifetime. Make the most out of every photon you can get and gain insights into your sample that are invisible to traditional imaging. Lifetime imaging on the STEDYCON is powered by PicoQuant’s established MultiHarp 150 hardware. Fully integrated into the STEDYCON smart control software, command is seamless and intuitive with no need for external tools or expertise. Process lifetime information within seconds: fluorophores in the same spectral channel but with different lifetimes are separated, giving you more channels and more flexibility. Exclude background signal or unwanted fluorescence based on lifetime signatures. You may also use lifetime information to increase resolution by combining it with STED: TIMEBOW STED exploits the spatial information encoded in fluorescence lifetime to push resolution and contrast – for clearer, more detailed images. Deconvolution and post-processing Transfer images and metadata from STEDYCON to LiGHTBOX with a single click. Start TRUESHARP deconvolution in an instant and use further post-processing features according to your needs.
CATEGORY
